Featured

Trace this…

How can you tell the processing times and true path of network frames within the ESXi host? Traceflow is the tool in NSX-T Data Center that is most commonly thought of for providing the insight into the traffic. But for a deeper dive, there is another tool. It is a switch while using pktcap-uw that shows detailed description of the process within the host’s memory. The switch is –trace. Check this out:

Workloads on two dPG; traffic physically routed

The first command [nsxcli -c get ports] gathers the necessary information from the host. This little shortcut to run an nsxcli command without invoking the entire CLI may have just made it worth your while on perusing this post! The PortNum gathered with that command is THE object to reference for all the tracing to be accomplished.

The next command [pktcap-uw –switchport 6718909 –proto 0x01 –trace] is the magic! Obviously we are identifying the source PortNum with the –switchport parameter, followed by a filter to only look at ICMP traffic. The switch –trace turns on the tracing capability running through the kernel.

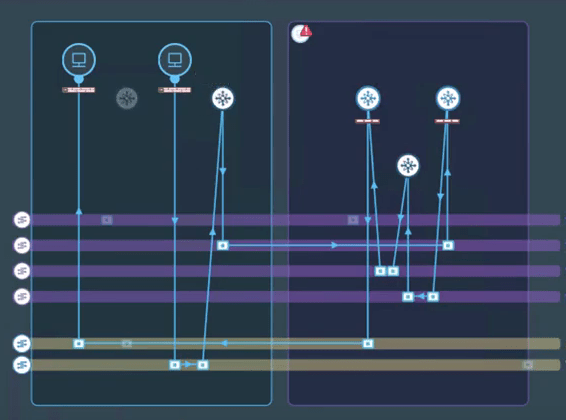
The first packet captured shows the IOChain from the injection of the frame starting at the vNIC, to the switchport, into the IOChain starting with the DVFilter (not in existence in this capture, since the VM is attached to a dVPg, NOT an NSX Port Group.) The timestamps provide a thorough story following the frame all the way to the UplinkSndKernel before the frame is released from memory. The UplinkSndKernel forwards the frame to the Physical switch from the pNIC.

The next packet begins being captured at the UplinkRcvKernel port. The frame can then be traced through the kernel until it arrives at the vNIC of the destination VM, when it is released from memory once delivered.

Look at those timestamps. From vNIC to pNIC took 47 microseconds. Arriving from pNIC to vNIC, 26 microseconds. Just glad I don’t have to click a stopwatch to gather this timing! Only 112 microseconds to process through my L3 Physical VLAN interfaces. Total RTT less than .2 ms. Pretty cool to be able to see this, right?

DFW impact

Now for another discovery that wasn’t as pleasant an outcome for me, as a advocate of the Distribute Firewall in NSX-T. I always new there was some overhead in processing dvfilter rules, but the trace showed a little more impact than I was expecting. Let me show you. I’ve removed many of the IOChain entries that you saw in the previous result in the one that follows, focusing on the impactful entries.

Workloads on same host, separated by Multi-Tier Routes and DFW Rules in place

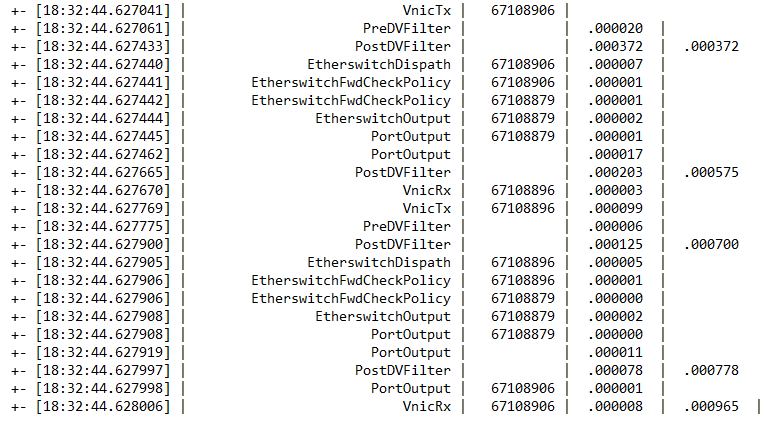
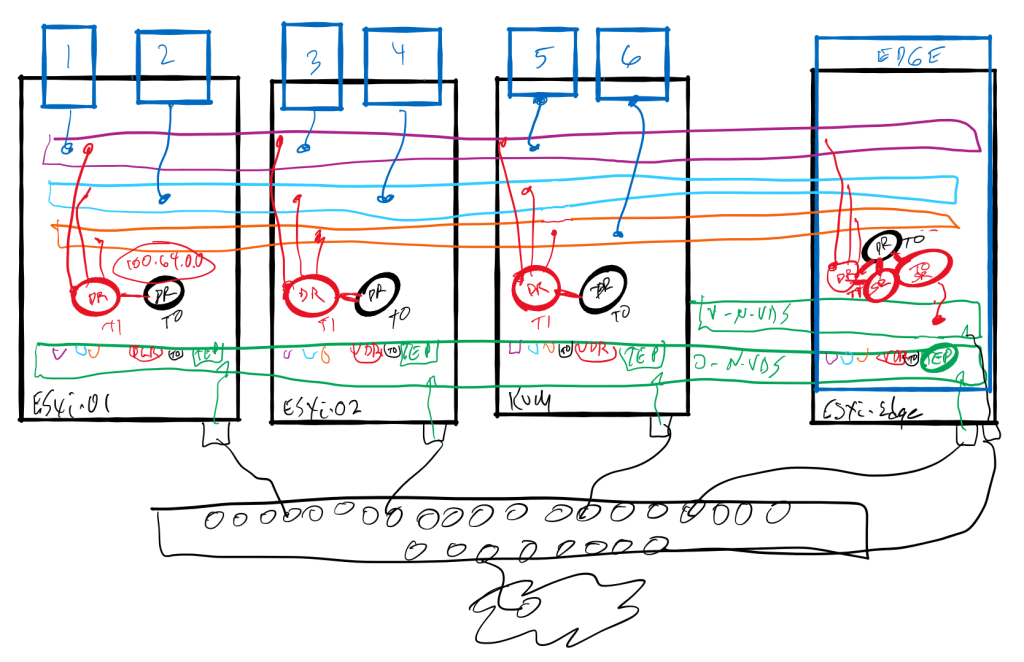
The source VM was attached to a logical switch (segment) with PortNum 6718906. 67108879 is one of my favorite switchports, the vdrport. PortNum 67108896 was the destination VM attached to another segment replying to the echo request. The second column from the right lists the delta times for each step. The last column is an accumulation of DVFilter (four hits), with the last number representing the total RTT. As you can see, instead of less than 200 microseconds as the previous example showed, we are nearing a millisecond with this trace. The majority of time was in the PostDVFilter column. (778 microseconds of the total time of 965.) The 187 microsecond difference is represents the data path from vnic-segment-Tier1-Tier0-Tier1-segment-vnic all taking place within the memory of this host.

While this test is certainly not a definitive study of the overall effects the Distributed Firewall has introducing a little latency into the data path, it is the first time that I’ve seen a tool that can assist in evaluating this factor. By the way, when the DFW blocks traffic, it happens extremely fast. The following trace shows the total time when a ping attempt is being rejected by the DFW, including the reject notification, is under 100 microseconds.

ICMP being REJECTED by the DFW

The rule in question on the dvfilter for switchport 67108906 was processed as Rule number 14, a reject rule for icmp. 55 microseconds to figure that one out! As you’ve all heard me say in the past, “YOU SHALL NOT PASS!” Good job DFW!

This tracing tool can be of great assistance in your troubleshooting the networking within an ESXi host. Let me know how you’ve put it to use.

Thanks for reading.

Featured

LDAP integration with VMware NSX-T Data Center 3.1 — with Custom Roles

It has been asked a number of times, “How can I use my Active Directory user accounts to manage NSX-T?” Well, that is why you’re reading this post, right?

It is a very straight forward process, let’s take a look:

We start by navigating to the Users and Roles under Settings, choose the LDAP tab, and select “ADD IDENTITY SOURCE.”

Next, we configure the settings for the Identity Source (Active Directory, usually). Name and BaseDN are required, then we select “Set” to enter the location and credentials for the LDAP Server. This can be any of the Domain Controllers (DC) that are running Active Directory. I like to use a Global Catalog enabled DC to lessen the amount of traffic on the network.

With the successful configuration of the Identity Source with the LDAP server identified, the next step is to add users from Active Directory. Slide over to the USERS tab and select ADD and Add Role Assignment for LDAP. The registered source (Active Directory) will appear in the Search Domain drop down menu. As you begin to type in the name of the user, an option to select the full account name automatically appears. Then you assign a Role to provide the appropriate authority for the user.

But what if the Role is not exactly what you want for a specific user? Ah, introducing “Custom Roles.” Slide over to the ROLES tab and select ADD ROLE.

Once you enter a name, select any of the oval “Read-only” icons. That will open the Set Permissions dialog box with the ability to change a variety of permissions to Read-only, Full Access, or None.

While Full Access and Read-only are fairly obvious, let’s take a look at what happens with None. We finish the Custom Role for Segment Manager with all other permissions set to None.

When we log in as a user assigned Segment Manager Role, his visibility into NSX-T is quite different. I changed his view icon to daylight (light view) for contrast.

The Network Overview shows 0 Gateways for this user, but all the Segments are visible. No Security or Services even appear in the GUI for a user with this role. You can also see that the “Connected Gateway” field in the Segments shows that this user is “not authorized.” If the user tried to add a gateway (e.g. to the AAA-VLAN20 segment) the None remains as the only item in that drop down listing.

So there you have it. Connecting to Active Directory and creating Custom Roles allows you to more effectively manage your NSX-T environment.

Check out the YouTube recording on the vgandalf http://www.youtube.com/c/vgandalf channel to see this happen in a recorded version. Cheers.

VMworld is now VMware Explore

As you have no doubt heard, VMware has changed the name of its very popular Customer and Partner event this year to start a new tradition. It came to our attention a couple months back and as presenters from previous VMworlds, we have been asked to submit for the honor of presenting at the newly named Explore. Thanks to the rebranded CXS booth, you could see me four times during the four days… 😉 I’ll put the links to the sessions below.

The upcoming event caused me a bit of nostalgic memories from previous VMworlds. The very first VMworld I attended was 2016. With encouragement from and a shout out to @Brett_Guarino, @v_gandalf was born. First on Twitter, then You Tube, then this blog.

Memories from that VMworld event include finding a cardboard tube in the show management trash pile behind the curtain near our Education Services stage. It was over 6 feet long and was originally a carpet roll, I believe. I always planned on using “You Shall Not Pass” as the introduction to my talk on the NSX Distributed Firewall but having a pile of trash representing a wizard’s staff seemed to my feeble brain as appropriate behavior. It was certainly the start of something. Twitter kind of blew up following that presentation. The next year I bought a prop of the staff. Year after that, I grabbed a set of robes. As I mentioned, vGandalf was born!

The second memory from 2016 was swag hunting with my friend Stephen DeBarros. We co-presented a break-out session for “Demystifying Control Plane Tables.” He named the session, truth be told. Most of our presentations were complete and we hadn’t been to the main hall to visit vendors, so we headed onto the floor. It was undoubtedly a simple swag hunt. Booth to booth, registering and/or sitting for presentations. I needed a break and sat down at a booth that was offering a GoPro camera to a lucky attendee. This was in Las Vegas so they used a “slot machine” to spin the pictures of the attendees to that presentation. After a couple faces showed up that had left the area, Stephen’s face shows up!! He won and walked out with a brand new GoPro.

We continued to wander the floor as I kept reminding him that I was the reason we stopped at that presentation! Sore feet and an offered chair was really the reason! We stopped at SanDisk for a presentation of solid state based vSAN including an amazing performance tracking display. Latency almost non-existent. In order to qualify, you had to see and collect four coasters from their booth and get a ticket for a drawing for three 3-D printers they were giving away. Drawing at 4:20. It was just after 3:00 when we walked away. After seeing a couple more booth presentations, it got to be a little after 4:00. Tired, but hey, it’s only 20 minutes until that drawing, so we hung out and were in the crowd awaiting the results. They drew a number and began reading it out. Stephen started to get a little excited. Every number matched his ticket right to the last digit. Our tickets were sequential. Yep, mine was the winner. Indeed a few weeks later a FlashForge Creator Pro Printer showed up at my house!

So this little swag hunt resulted in over $1500 retail product between the two of us. Needless to say, I wanted to return to VMworld. Funny though, I have seldom walked the floor searching for swag in the subsequent VMworlds. It has been my pleasure to be in 2016, 2017, 2018 and 2019 in person. Las Vegas is my preference to San Francisco, but the conference over-rides any location preference! I’ve also done recorded and live sessions during the pandemic incited on-line events in 2020 and 2021. I’m VERY excited to be heading to San Francisco this year to re-acquaint myself with Corey, Alistair, Abdullah Abdullah, and the multitudes attending VMware Explore. vBeards gather at each of the in-person events. Always a great picture with a collection of bearded geeks! Cheers friends — See you there.

If you would like to know where I may be during Explore, the following link is a catalog search on my name: https://event.vmware.com/flow/vmware/explore2022us/content/page/catalog?tab.contentcatalogtabs=1627421929827001vRXW&search=burkard

I am delivering four talks in the CXS lounge. That is probably where I will be spending the majority of my time when not out visiting with new and existing friends. Come by and say hi!

VMware NSX-T Upgrade Coordinator in action

Hello again.

The Upgrade Coordinator will take you through the many steps to get the NSX-T Data Center environment. First thing to do is get the NSX Upgrade Bundle which will take up nearly seven gigs on your hard drive and over your network connection. That used to be a big deal, right?

Then we have to Upload the MUB to be used by the Upgrade Coordinator. Once complete, we can click the UPGRADE button to begin the actual upgrade process. EULA follows, scroll to the bottom, reading all the way, and click CONTINUE, the NEXT.

Refresh the browser to see the NSX Appliances Upgrade noted as “In Progress” so we’ll “CONTINUE WITH UPGRADE.” The next page is one of the MOST important steps in running the Upgrade Coordinator:

The PRE-CHECKS. Running All Pre-Checks will find issues that could prevent a successful upgrade. Do not skip this step under pain of failure. It is very enlightening. Truly.

Oh yes, if there are NSX Intelligence Appliances within the NSX-T Data Center environment, there is another upgrade bundle necessary to grab and install. Another three GB of data and storage and 60 minutes of upgrading time.

It is recommended that you run a backup of the NSX Management Cluster prior to continuing with the actual Upgrade. Certainly you have a current backup, right?

At this point, the upgrade of the NSX-T components can actually, finally begin. The “Edges” represent the first set of objects to be addressed. The upgrade order across groups and within each group is set and then the START button begins and the process runs its course. When each group is at 100%, it is most appropriate to run the “post checks” to ensure the upgrades were successful. Then we can advance to the Hosts by clicking the NEXT button.

By the way, from personal experience, if you have created Edge Clusters with more than two Edge Nodes, you may wish to eliminate many of the “extra’s” before running your upgrade. In my processing, each Edge Node approached 30 minutes of upgrade time. It may benefit you to add New Edge Nodes post upgrade if the cluster has extras. That is my two cents worth.

At this point, we are going to upgrade the Transport Nodes (ESXi Hosts) within their clusters to the version desired. Similar to the Edge Nodes, we can choose Serial or Parallel order across the groups. Also, a post upgrade check can be run on the hosts, as well.

The NEXT will now move to the Manager Nodes. After reading a warning, proceed with the upgrade. The Manager upgrade will cause the node to disconnect and if using the VIP, another Management node will take control of the VIP address and you can follow the progress there. With a single node (PoC or Lab ONLY), the disconnect time will probably last nearly 30 minutes. It is also possible to track the progress of the upgrade through the CLI of the Manager, as seen below.

Once reconnected, viola, the newest version of NSX-T Data Center is installed. The default of NSX-T 3.1 UI is the dark mode. One more step is needed. We have to restart the install-upgrade service through the CLI.

Sweet. Finish.

I hope this has been helpful. Please take your time and be sure to run all the PRE-CHECKS and POST-CHECKS to ensure a successful upgrade of NSX-T Data Center to version 3.1 (and beyond?)

In case you are interested in upgrading to the latest version of VMware’s virtual networking and security platform, NSX-T Data Center 3.1, I have posted a video on my YouTube Channel (https://www.youtube.com/c/vgandalf) detailing the process of using the wizarding process called the Upgrade Coordinator. Check that out for more details.

Demystifying VMware NSX-T Data Center Packet Flow

I recently published a series of YouTube videos building block diagrams outlining the logical structure of NSX-T Data Center infrastructure. This was based upon NSX-T version 2.5.1. In this blog, I’ll recap the three videos which you can view on my YouTube channel.

In the first of this series (volume 2, number 1) I described the preparation of the transport nodes. This process installs the NSX bits onto the hypervisor (ESXi or KVM) and then creating a transport zone or two and defining the N-VDS that will host the virtual networking infrastructure. The N-VDS became realized on each transport node and was populated with a tunnel endpoint (TEP) that will be used by the overlay protocol to encapsulate the underlay traffic. Man, that’s a mouthful. Let me show you what I mean.

Now that NSX is installed onto the transport nodes, the next video in the series diagrammed the logical networking components. The video (Volume 2, number 2) defined the workings of the logical switch or “segment” for layer 2 communication and laid out the layer 3 distributed routing component of the “gateway” that exists within the hypervisor. Both the segment and the gateway are created as an object which exist on the N-VDS. We have referred to these objects as port groups in the past, and will again!

Each virtual machine (workload) attaches its virtual network card (vnic or vif) to a logical port on the logical switch. This ensure connectivity on layer 2. In the below diagram, VMs 1, 3, and 5 are all on the “blue” segment, 2 and 6 on the “yellow” segment, and 4 isolated on the “magenta” segment.

Here you can see on the N-VDS, the color coordinated port groups associated with each segment and the distributed router.

The magic of layer 3 happens on a hypervisor with a distributed gateway (DR) connecting to the segments on each hypervisor as well. This DR provides inter-segment forwarding through the use of that VDR port on the N-VDS. In this way communication between VM1 and VM2, for example, will not leave the memory space of the hypervisor on which they are each running.

In the final (volume 2, number 3) video, I discussed the packet walks when using distributed routing and a service router (SR) component on an Edge Node cluster. I followed the path with an SR on the Tier-1 Gateway and without an SR, relying on the DR only for Tier-1 and using the SR of the Tier-0 for egress to the physical world.

Tier-1 DR and (on the Edge) SR and a Tier-0 DR and SR also on the Edge (SR in red, oops)

While the diagram came in handy for the initial discussion, a deeper discussion used VMware vRealize Network Insight (vRNI) topology path view to really describe the path between workloads with and without having the SR on the Tier-1. Two workloads on two segments will require a path to the Edge cluster if even one segment is connected to a Tier-1 gateway with an SR. In the video, I show the paths with and without the SR component on the Tier-1 gateway.

Both of the segments to which these two workloads are connected have a Tier-1 gateway with an SR

The conclusion I hope to pass along with both the video and this short blog, is that attaching a Tier-1 gateway in NSX-T to an Edge Cluster is necessary to support stateful services (Network Address Translation or Gateway Firewall, for example). If this Tier-1 gateway is not going to support these services, then it is inappropriate to assign an Edge Cluster to that gateway. That could have an unexpected impact on network traffic flowing in a “sub-optimal” path hair-pinning to and from the edge cluster when routing east-west traffic within the data center.

Hello World

Well, why not?

It has been on my mind for some time that I should try the blogging thing, so here goes…

This site will include thoughts, ramblings, musings and possibly some insight into the techno-world we are sharing. It will have content surrounding my work, mostly, but some times it may refer to outside-of-work interests. It may include a bit about who I am, how I came to be, what I am becoming. Mostly, the site intends to help educate and clarify topics that seem to be unnaturally confusing. Like routing in a virtual network. Or what does it mean to be working in a software-defined-data-center? Or how does Gandalf’s beard become shorter when it turns white? Yeah, you know, stuff like that…

Any way, that’s it for now. You may see some cross-referencing to a YouTube channel (http://www.YouTube.com/c/vgandalf) and with written explanations to the video content uploaded to that location, as we work together to “demystify” techno-babble.

Cheers.